The TYT TH-7800 dual-band VHF/UHF mobile transceiver has a lot of features and makes a nice compact 50W/35W base station radio. Size is 5.7 (w) x 1.65 (h) x 7.5 (d) inches and weighs 2.2 lb.
Note the large front panel display which shows the dual receiver frequencies. The independent volume and concentric squelch controls on the bottom left and right lets you monitor 2 frequencies at once on each band or on the same band. Receive frequency range on VHF is from the bottom of the aircraft band at 108 MHz, 2 meter ham band and other services to 180 MHz. UHF coverage is from 350 MHz to 520 MHz which includes the 70cm ham band. The frequency can be varied by rotating the knobs on the upper left or right side, or for the selected MAIN side, by the up/down switch on the top of the mic, or using the mic keypad.
The TH-7800 can be programmed with up to 809 memory channels either using CHIRP from your computer or manually from the front panel or mic. Short pressing the "V/M" button on each side of the front panel or the "P2" button on the microphone on the selected "MAIN" side, toggles between setting a frequency in the VFO frequency mode, or stored frequency in the Memory channel mode.
50 Watts transmit power on 146 MHz and 35 Watts on the 446 will let you work just about any repeater you can hear and more than enough to talk to those with hand held radios on simplex. But if you don't need so much power, you can set the output power to 20W, 10W or 5 W output on either band by short pressing the respective sides "LOW" button on the front panel or "P4" on the microphone for the selected transmit "MAIN" side. The radio runs on the nominal 13.8Vdc at up to 8.5 Amps in high power transmit and 1/2 Amp in receive.
Which side you use for transmitting can be selected by short pushing the respective upper left or right side frequency knob or toggle the microphone "P1" button. This selects the "MAIN" side as indicated on the top row of the display. You can run cross-band duplex or repeat with this radio which means you can transmit on one band and still receive on the other band at the same time. In Cross-band repeat mode, you can use your base station radio with its better antenna and power with your hand held radio if in range.
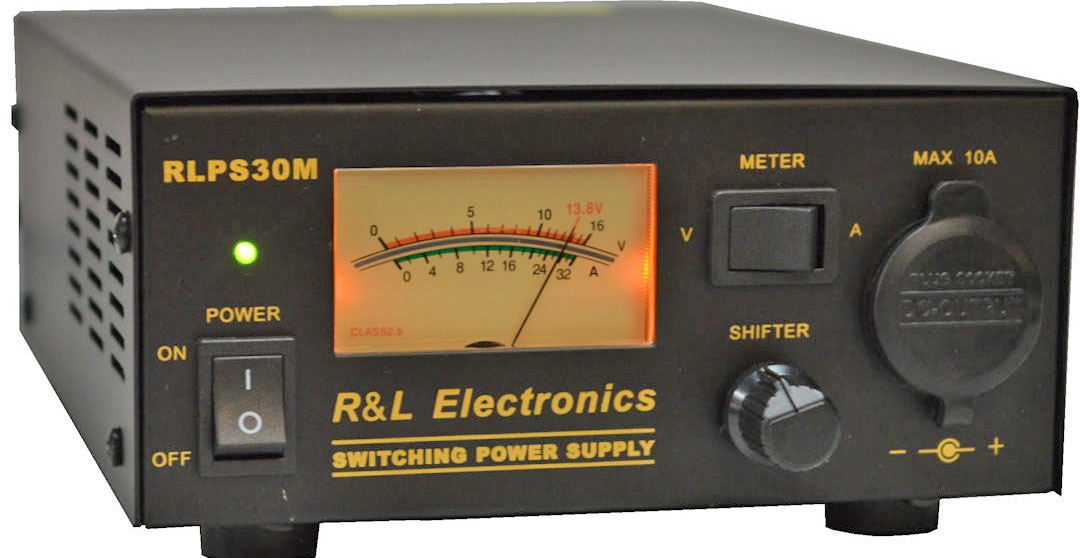 Power Supply - In place of being powered by the car electrical system, you will need to connect a 13.8 Vdc power supply. The black lead from the transceiver goes to the negative or ground terminal and the red lead goes to the plus or positive terminal. Double check your connection, you don't want to reverse it. The example shown right is the R&L Electronics RLPS30M rated 25 Amp continuous DC power supply which is ample for the nominal 8 Amp current draw of the TH-7800 in high power transmit. If you buy the TH-7800 at the same time with this power supply, it is only $10 more including shipping - TH-7800 + RLPS30M $209.
The radio and power supply can get warm, especially during long transmissions, so place them on the desk, table or shelf with nothing around them closer than 3 inches for cooling. Add 4 rubber or plastic bumpers to the bottom of the radio to make an air gap. The mobile mounting bracket can be used to hang the radio under a shelf, and the microphone clip next to it about 6 inches to the right on the side wall of the shelf.
First Turn On - With nothing connected to the power supply DC terminals, turn it on and verify on the Voltmeter that it indicates a little under 14V. Then you can leave the power supply meter switch on Amps. Turn off the power supply. Connect the Antenna and power supply to the radio and you are ready to go. Turn on the power supply, then press and hold for for more than a half second the bottom right side volume control knob to turn the radio on. Rotate the concentric inner squelch control on the volume control full counter-clockwise and adjust the volume control un-squelched noise level to your ear. Then rotate the squelch control clockwise to silence the right side receiver. Repeat with the left side squelch and volume control. If the radio is left turned on, you can turn the radio off and on by simply using the switch on the power supply. The left volume/squelch control when short pushed toggles between dual receiver and single receiver. A long press of a half second or more toggles between locking and unlocking the front panel controls.
800 memory channels are way more than enough for base station use. We recommend loading the first 127 channels with the same ones programmed into your hand held radio to make it easier to remember your most used channels. It will save a lot of time if you upload to this radio using the TYT programming cable and the CHIRP application.
If you dont have the CHIRP programming application you can try out the radio by punching in a simplex frequency in the VFO mode by short pushing the respective sides V/M button. This transceiver operates the same as the Baofeng HT in that you short push the key pad on the mic with 6 digits to enter the frequency. You can also rotate the upper right knob similar to the up/down arrow keys on the HT to increment. Ask Tom for a spread sheet with the memory channel list to keep by your radio.
Once you have the radio set up and operating on your favorite repeater or simplex frequencies in both the left and right sides, press and hold one of the Hyper Memory Keys (A to F buttons on the front panel) for 2 seconds to save that configuration in its own memory. This is handy if you accidentally hit some wrong buttons and want to quickly get back to the desired configuration just short press that same lettered button. The other lettered buttons can be set up in the same way for other most used configurations like weekly nets, etc. See the Front Panel and Microphone Description pages in the manual for more functions.
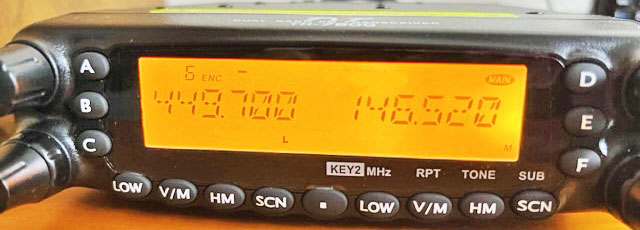 If your radio has been programmed with the most used repeater and simplex channels in the area, the Mt Wilson Open repeater when memory channel 6 is selected (top line left side) and its frequency, 449.700 in the display. If there is no small channel number you are probably in VFO or Frequency mode and you want to be in Memory mode. To change to the Memory mode, short poke the V/M button and the channel number should appear. Rotate the right side control knob until you reach channel 6. You can also punch it in from the microphone pad by poking 006. The L in the display on the bottom line means the transmitter is set for 5 Watts, or low power. You are now ready to work the repeater. The right side receiver in the photo has been set for simplex on 146.520 MHz in the VFO frequency mode and as the "MAIN" side to transmit. Toggle to the repeater set in the left side with the microphone "P2" button.
Hold the mic a couple of inches away from your lips and speak directly toward it in a normal voice. Squeeze the push to talk (PTT) button on the side of the microphone, wait a half second and say "testing" and your call letters, then release the button. If all is right and you have a good path to the repeater, you should hear it beep, possibly identify in morse code and then a squelch tail.
Using CHIRPIn Macs, double click the CHIRP Icon to open it. You might get a pop up that the developer cannot be verified or is unsigned. Click cancel, then while holding down the control key, click the CHIRP icon once then click open at the top of the pop up. You might have to click the icon while holding the control key down a few times and then open in the pop up to get it to open. It may ask for your user ID and password to add chirp and/or drivers to the permitted apps - go ahead and do that the same way you do when you start up your computer. Once you have gotten the CHIRP screen to open, you won't have to go through the control key procedure again.
In Windows, search for CHIRP which is likely in Program Files or your Download folder, and open it.
Turn on the radio and verify you are not receiving any station or noise. You may have to unscrew the antenna or select another channel if there is anyone on the channel or it is picking up static from the computer. Turn off the radio. Plug in your programming cable only to the computer which is connected to the internet. Your computer should then recognize the USB com port and get the correct driver from the internet. Only use the TYT Programming cable that came with the radio. There are many pirate ones on the internet.
If connecting your TH-7800 radio to CHIRP for the first time, from the RADIO pull down menu, select Download From Radio to initiate it and use to input your memory channel and operating data. In the Radio dialog box select TYT and TH-7800. If your computer does not automatically select the right Com port in Windows, you may have to try changing the COM number until it does. In MACs the Port will show the driver name. Downloading or uploading to this radio can be slow, so be patient. Save As and name the file as your base data plug in - ie., your call and TYT7800.