Click Images to Expand
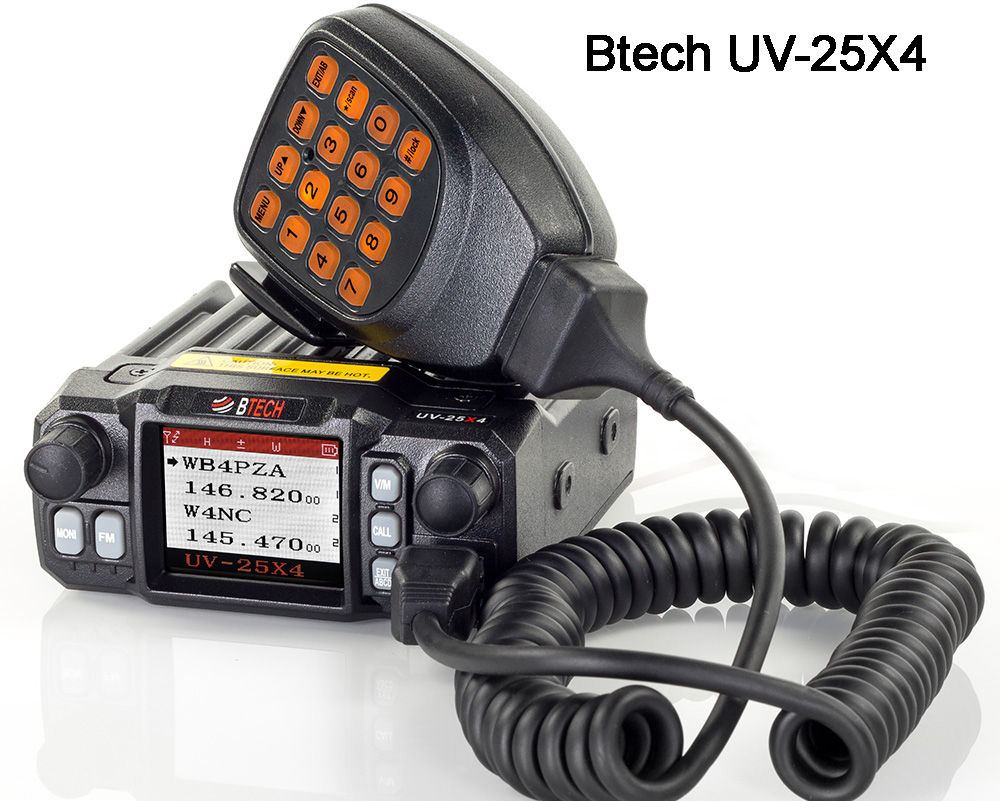 The Btech UV-25X4 tri-band mobile transceiver makes a nice base station transceiver - Review. While it is small - 3.85 (w) x 1.38 (h) x 4.65 (d) in, weighing 1 lb - it packs a lot of features. The 25 Watts transmit power on 146 MHz and 20 Watts on the 446 and 223 MHz bands will let you work just about any repeater you can hear, and more than enough to talk to those with walkie talkies on simplex. If you want to transmit in the 223 MHz band, you will need a tri-band antenna, or just stick with 146 and 446 MHz with a dual band antenna. We recommend running half inch low loss coax from the antenna to the back of the radio such as 9913 or LMR-400. If your coax has N plugs, you will need a N female to UHF male adaptor as the radio has a UHF SO-239 antenna jack. Never transmit without a proper antenna connected.
The radio will get warm, especially during long transmissions, so place it on the desk, table or shelf with nothing around it closer than 3 inches for cooling. Add 4 rubber or plastic bumpers to the bottom to make an air gap. The mobile mounting bracket can be used to hang the radio under a shelf, and the microphone clip next to it about 6 inches to the right on the side wall of the shelf.
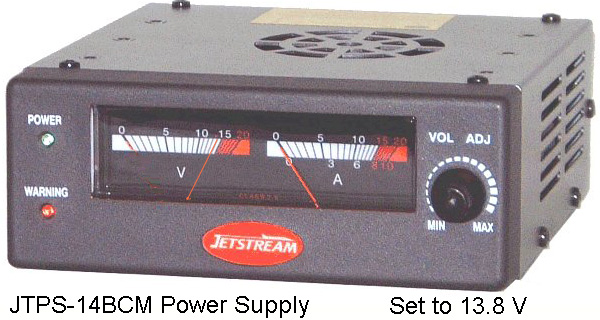 Power Supply - In place of being powered by the car electrical system, you will need to connect a 13.8 Vdc power supply. The black lead from the transceiver goes to the negative or ground terminal and the red lead goes to the plus or positive terminal. Double check your connection, you don't want to reverse it. The example shown right is the Jetstream JTPS-14BCM rated 12 Amp continuous DC power supply which is ample for the nominal 5 Amp current draw of the UV-25X4 in transmit, and it has terminals for optionally charging a back up car battery in case of AC power failure. The VOL ADJ knob on the front sets the DC Voltage, not volume. Make sure it is set to just a hair below the 14 mark on the Voltmeter. The on/off switch is located on the back of this power supply and can be used solely to turn your radio on and off rather than also push and holding the volume control knob on the left of the radio.
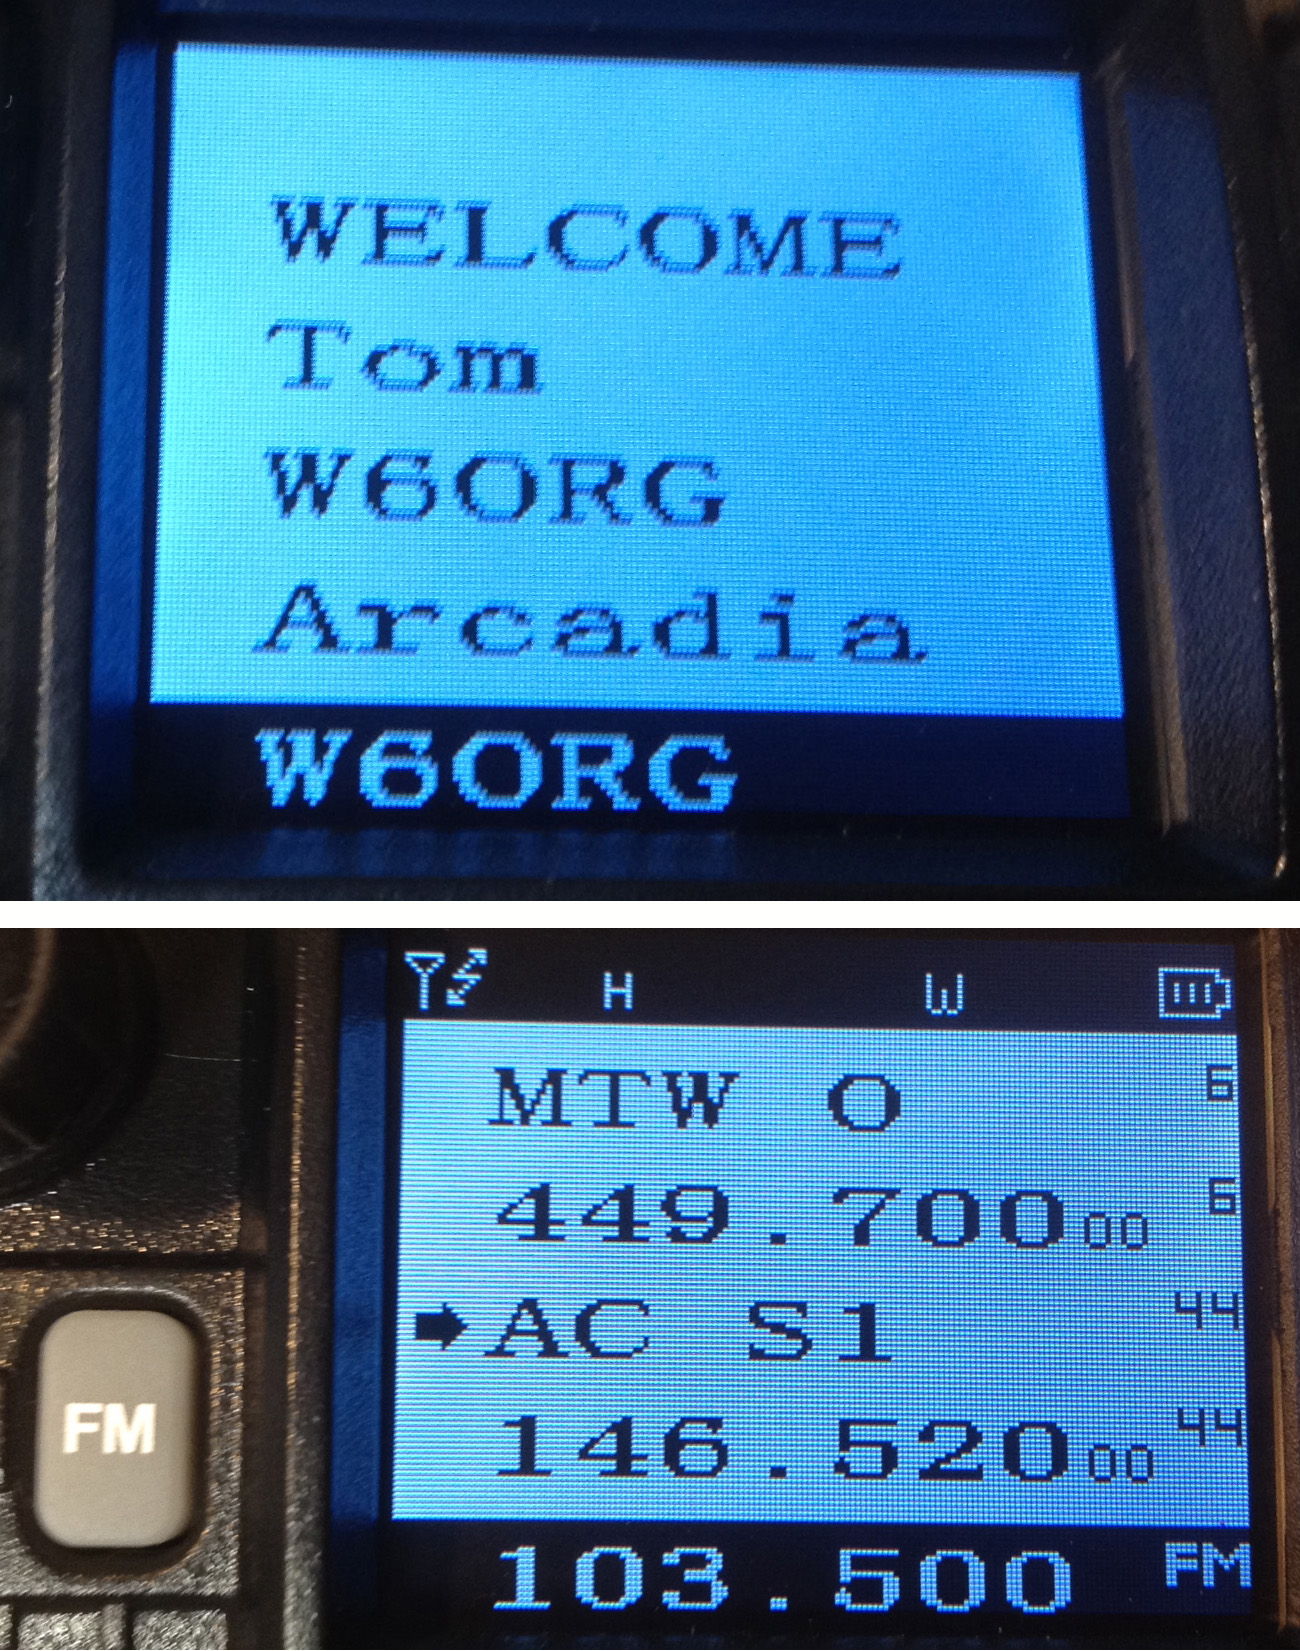 First Turn On - Antenna and power supply are plugged in and you are ready to go. Turn on the power supply, verify the V meter needle is a hair under 14, then poke the volume control knob on the top left to turn the radio on. You should get a quick Welcome message on the display and some beeps. Poke the MONI (Monitor) button below the volume control and adjust the un-squelched noise level to your ear. Then poke again to squelch the speaker.
If no ham station is being received, you can poke the FM button, and adjust the volume for a local station set with the control knob in the upper right. The FM broadcast frequency will appear in the bottom display line. Poke the FM button again to return to the ham bands. When the FM broadcast audio is selected, it will cease when ever a ham station is being received. The FM broadcast audio will return after about 5 seconds to fill in when no ham station is present on the selected ham channel. We do not use the CALL button.
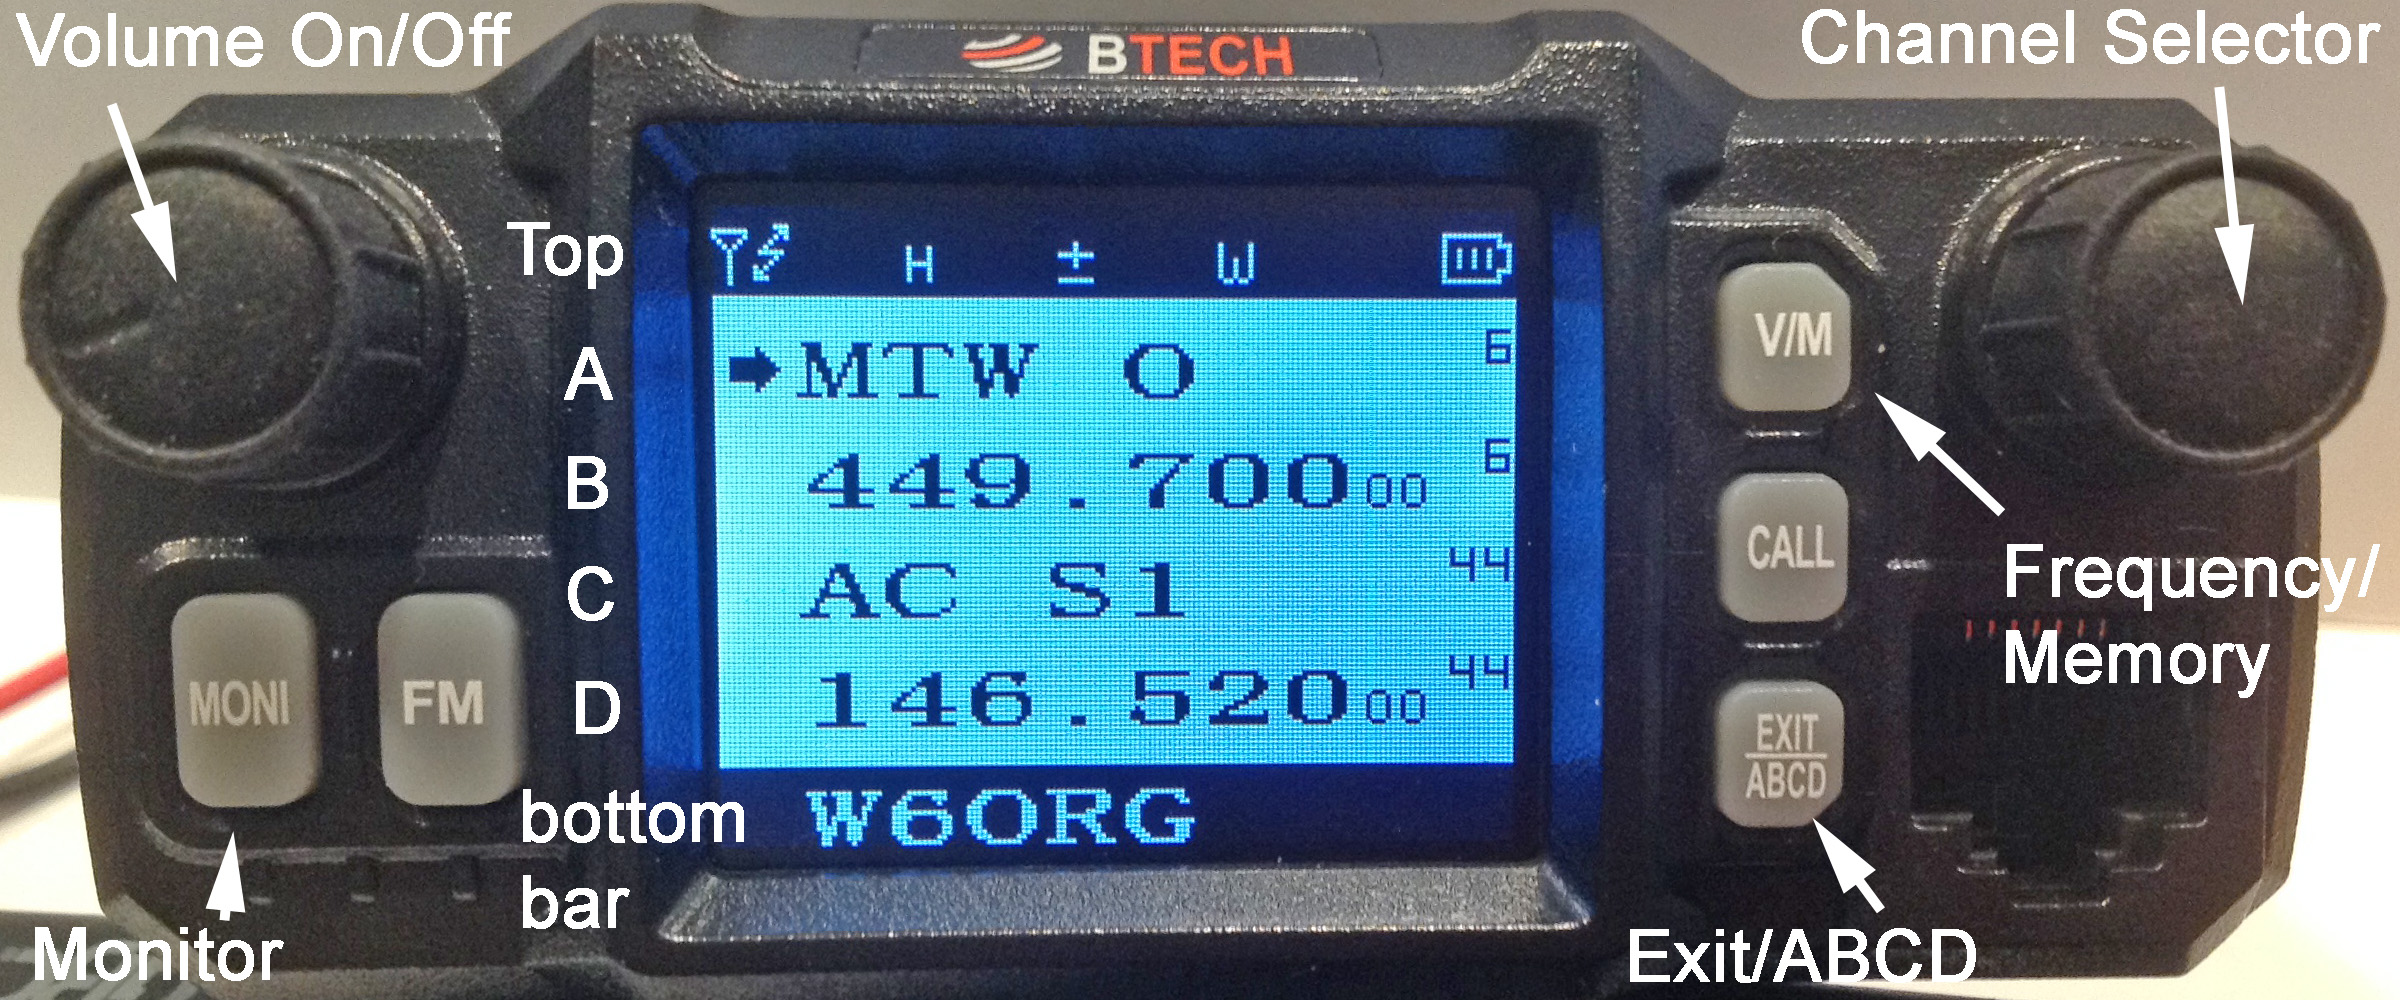 If your radio has been programmed with the most used repeater and simplex channels in the area, the Mt Wilson Open repeater (MTW O 6) should appear in the A or top line and its frequency, 449.700 in the B or second line. The A and B lines are synced to each other and C is synced to D. Change one and it's companion also changes. The arrow on the far left points to the active channel - A and B. C and D has the standby channel you can quickly go to by poking the Exit/ABCD button and - 146.520 simplex used in the AC100 race - becomes the active channel. The memory channel number is a very small and hard to see number 6 to the far right on the display. If it is anything else, make sure the arrow on the far left of the display is pointing to line A or B. If there is no small channel number on the far right, you are in VFO or Frequency mode and you want to be in Memory mode. To change to the Memory mode, poke the V/M button and the channel number should appear. Rotate the right side control knob until you reach channel 6. You can also punch it in from the microphone pad by poking 006. You are now ready to work the repeater.
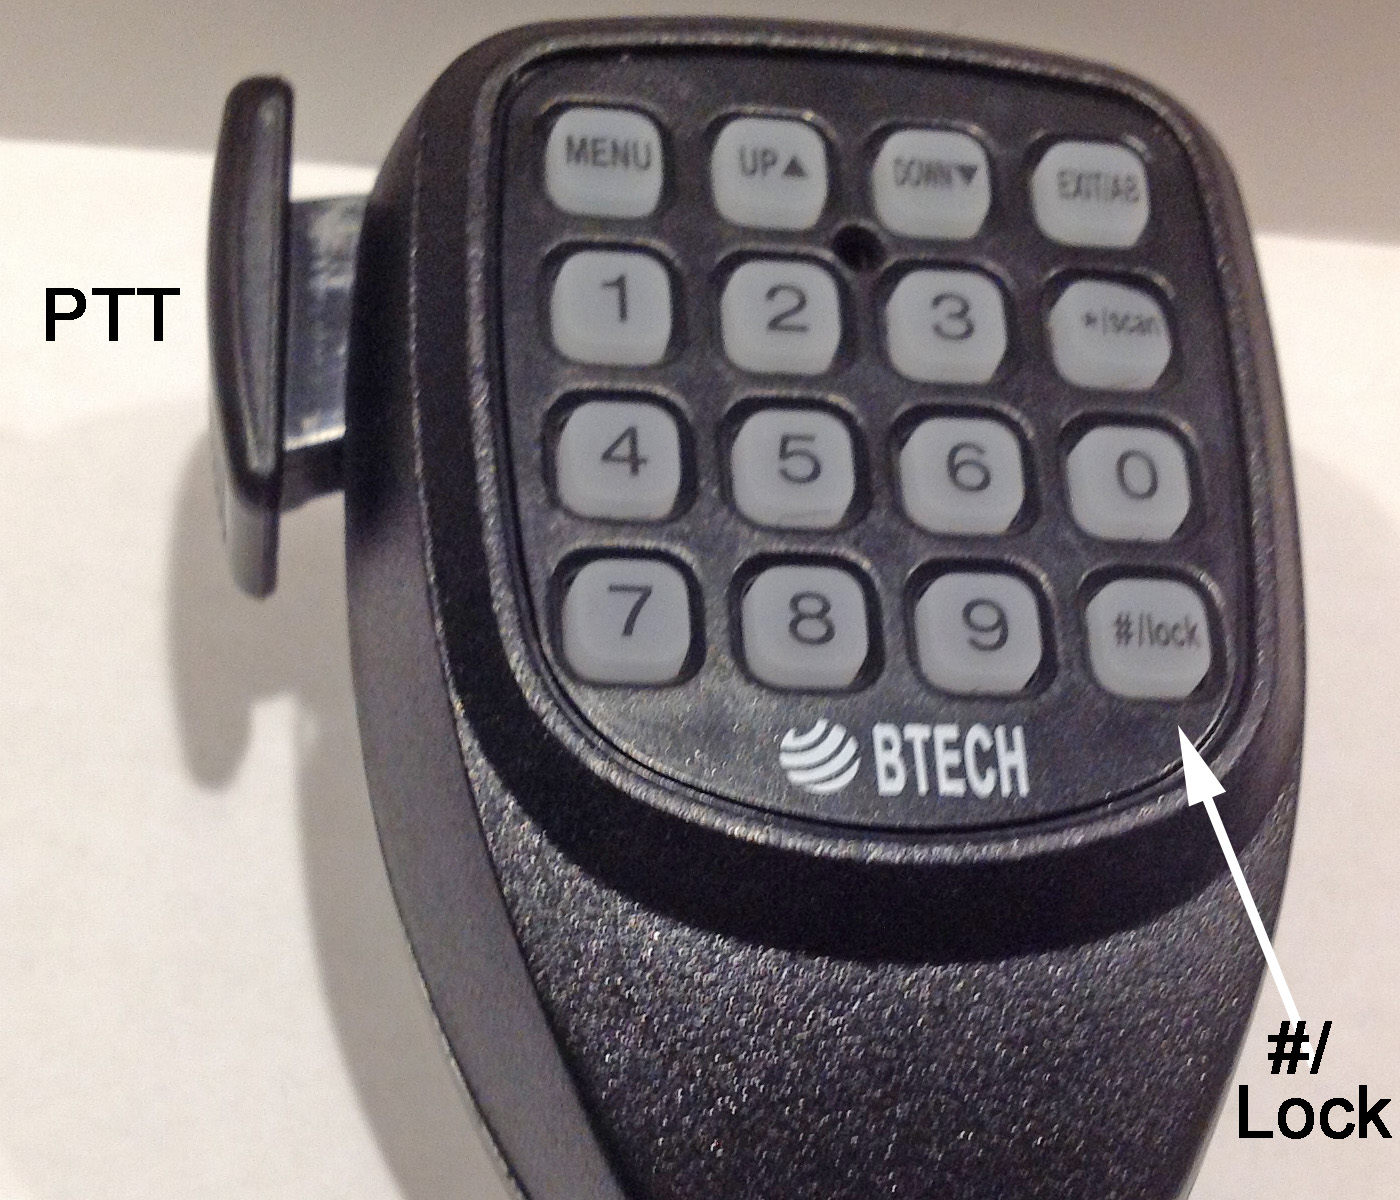 Hold the mic a couple of inches away from your lips and speak directly toward it in a normal voice. Squeeze the push to talk (PTT) button on the side of the microphone, wait a half second and say "testing" and your call letters, then release the button. If all is right and you have a good path to the repeater, you should hear it beep, possibly identify in morse code and then a squelch tail.
The microphone #/lock key in the bottom right can be used to toggle between high or low transmit power. The upper bar on the left side of the display will show a H for high power or a L for low or about half power. Poke the # key to change it. If you hold down the key for a second, you will lock the mic keyboard and radio panel buttons. A key symbol will appear on the right side of the top display panel when locked. Hold down the #/lock key again to unlock.
200 memory channels are more than enough for base station use. We recommend loading the first 127 channels with the same ones programmed into your walkie talkie to make it easier to remember your most used channels. This transceiver operates the same as the Baofeng HT in that you poke the key pad on the mic with 3 digits to change memory channels. You can also rotate the upper right knob similar to the up/down arrow keys on the HT to increment to a channel. Ask Tom for a spread sheet with the memory channel list to keep by your radio.
Display Bottom Bar - When there is no signal being received, the UV-25X4 model number appears but your call letters can be programmed in its place. This bar changes when receiving a station and when you transmit.
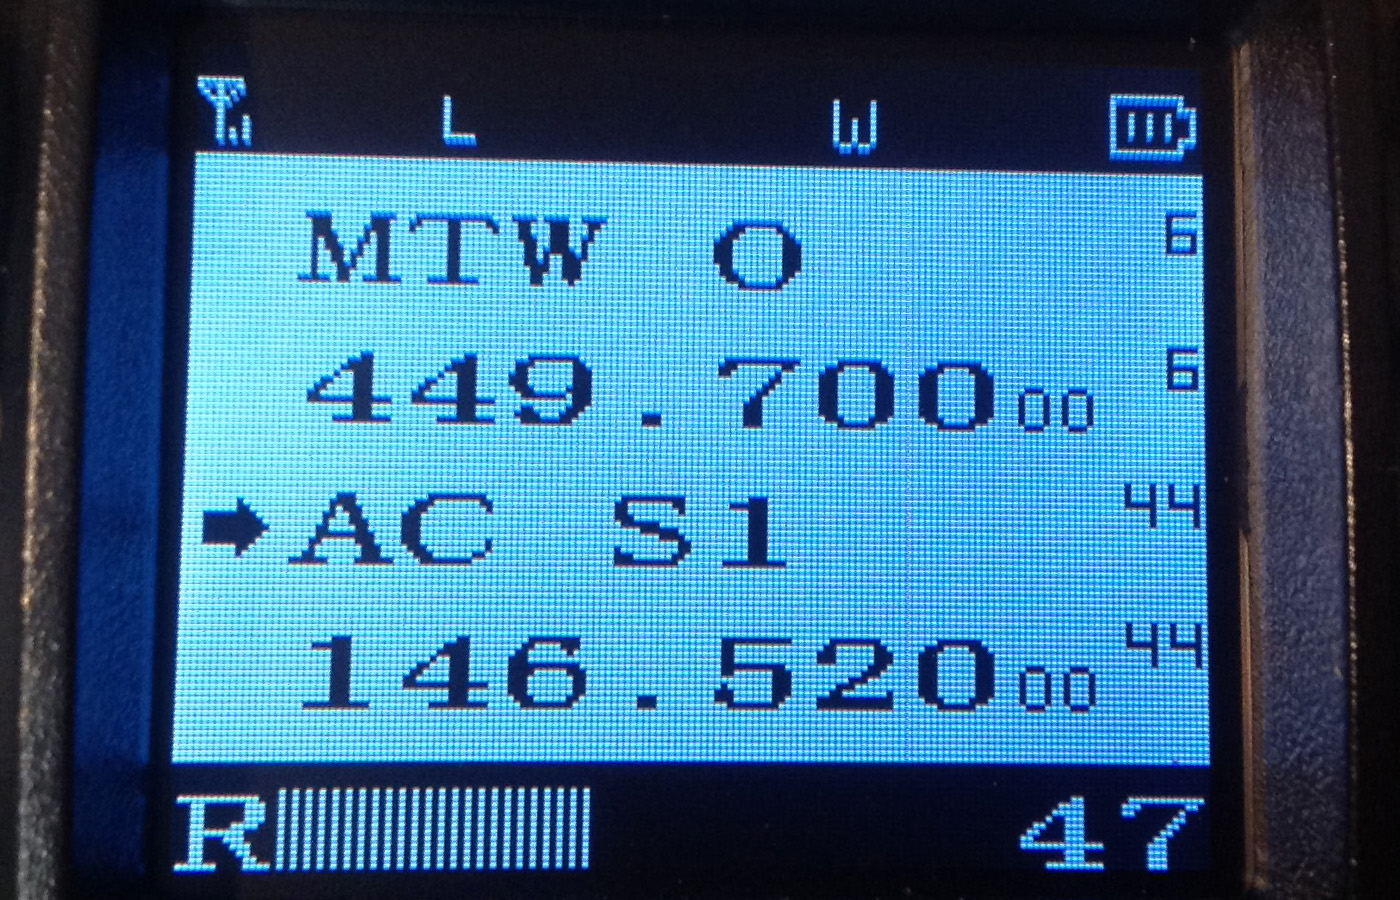 S-Meter - When a station is received (R), the display changes to an S-Meter or signal strength meter. As the signal is stronger the bar graph expands to the right and there is a number on the far right. The bar graph is very handy for finding a magic spot for an antenna or to tell you something about changing atmospheric conditions. The number gives the relative signal strength, but surprisingly, each successive digit represents about a 1 dB change. This helpful to compare antenna efficiencies, peaking directional antennas and other transmission variables. No signal on 146.520 MHz with un-squelched noise (MONI) read 21. Shown is 47 which tested out to be a 1 microvolt or -107 dBm signal. The numbers will vary radio to radio and band to band.
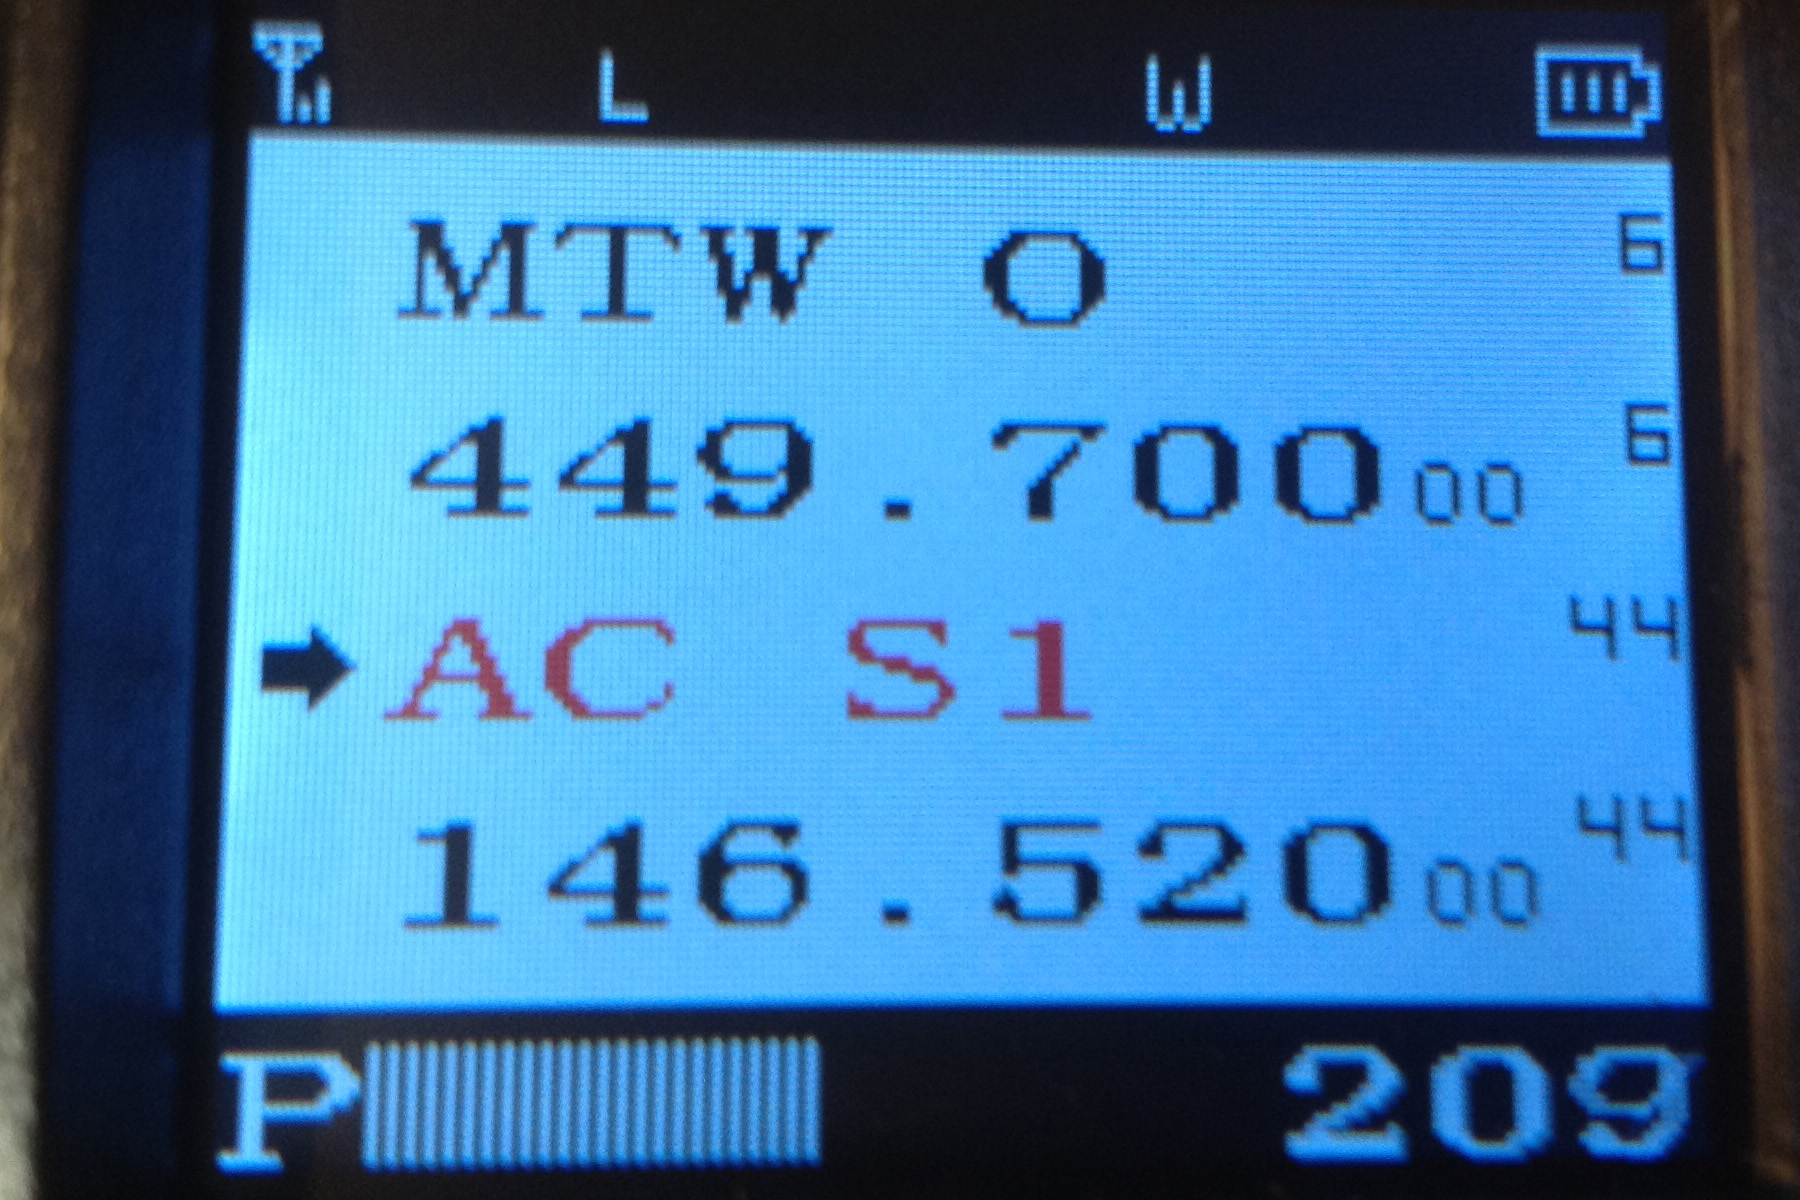 Transmit Deviation Meter - Shown is the (P - power) bar graph while transmitting with the low power setting. Note the L in the upper bar. If set for high power, the bar graph is full across. Another surprising plus for this radio is the number on the far right. The number actually indicates the amount of FM deviation. Shown is 209 which tested out to be 2.09 kHz deviation. It will vary with your mic audio volume. If you hit above 400 you are probably too close to the mic or speaking too loud. 200 - 300 would be a desired normal average.
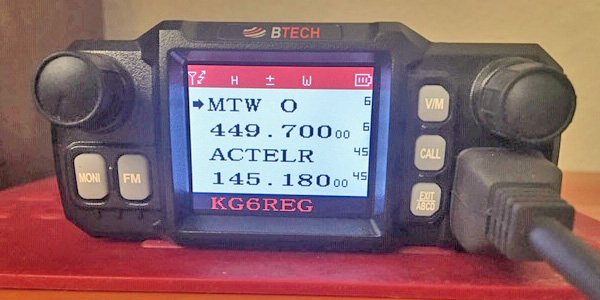 Display Colors - You might want to change the background and text colors on your radio to make them more readable to you depending on your color vision or just because you can. Actually you can change the top bar, middle four lines and bottom bar independently. But let's just get used to changing the radio's preferences by using the Menu function to first change the middle 4 lines of the display. Using the Menu function on this radio is similar to the Menu function on the Baofeng UV-5R walkie talkie.
All the Menu functions are done with the radio in receive. So as to not accidentally hit any of the buttons on the mic, unplug it from the radio. You can use the mic pad instead, but I find it easier and quicker with the knob. To enter the Menu function, poke the upper right knob. When you do, you will hear a beep and lines C and D will show the name of the menu item in C and the selected state in line D. If you do nothing for 15 seconds, you will hear another beep as it returns back out of Menu to frequency or channel mode with no changes. You can also poke the exit button at the bottom right to exit Menu mode. If you have CHIRP, you can also use it to program changes or return the radio to its last saved parameters.
 Your radio likely came with the center 4 line ABCD display having black text over a white background. For me, I found that a blue back ground with white lettering showed up best, especially the small channel numbers on the far right so that combination will be our example. You may prefer white on black or have fun trying various combinations. Your choices are black, white, red, blue, green, yellow, indigo, purple and gray. Note that the radio will not let you blank out the display by using the same color for text and background.
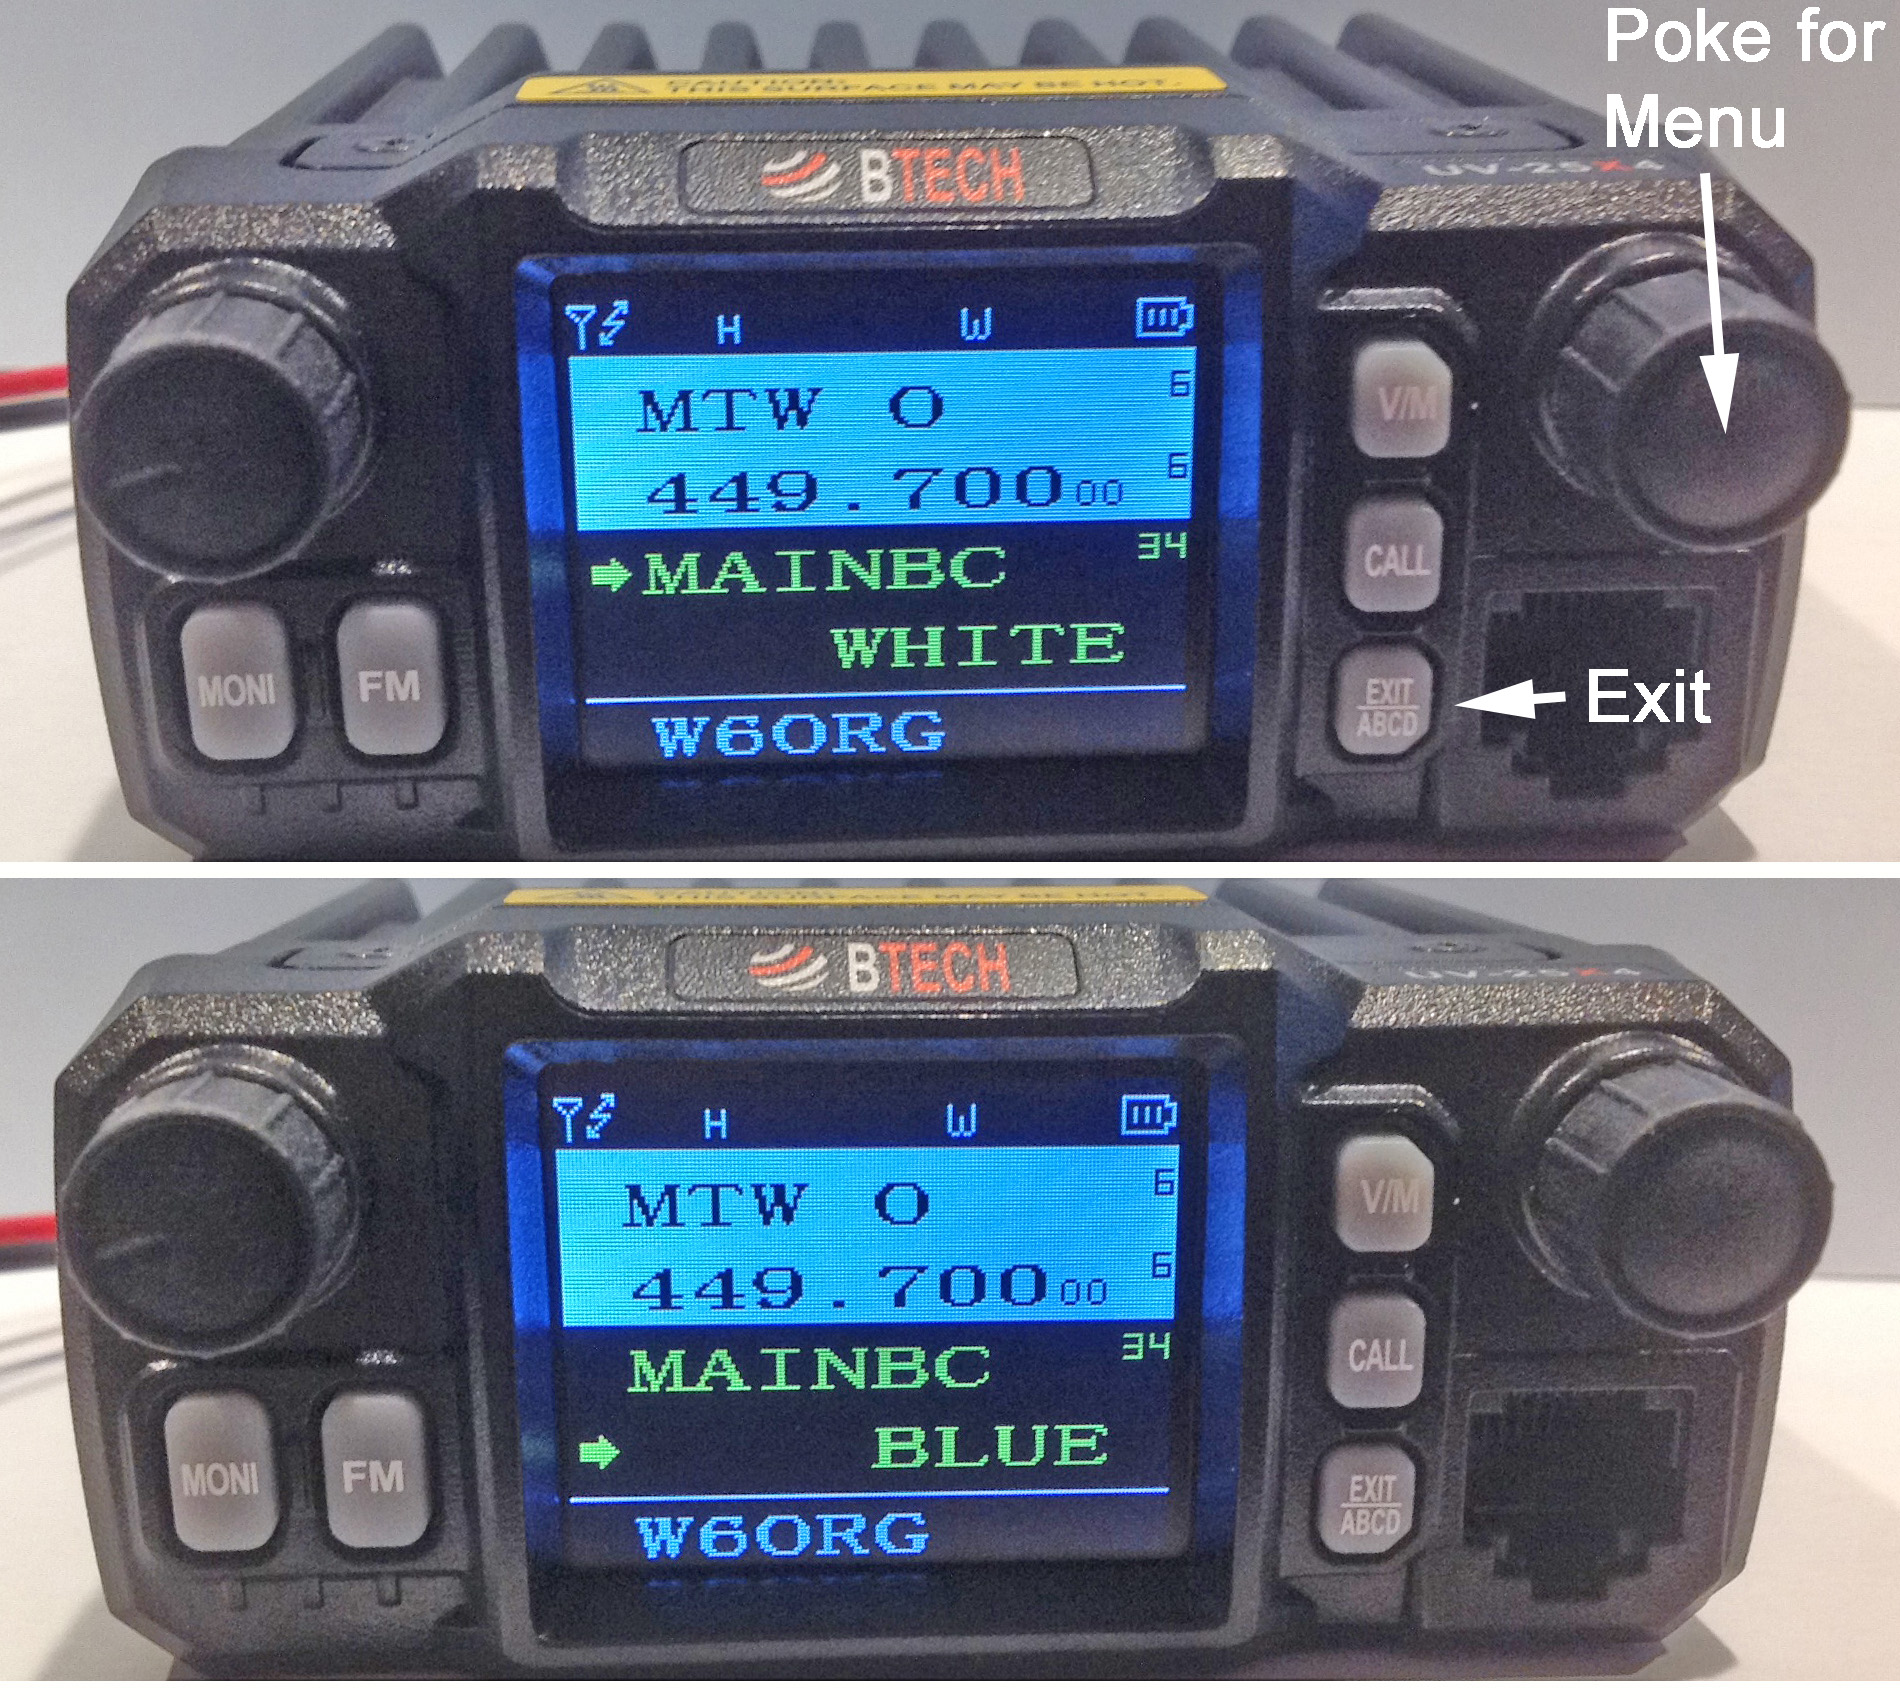
Here we go - don't worry if you take more than 15 seconds between poking or moving the knob and time out, just start over. Poke the upper right knob, then turn that knob for Menu item MAINBC 34 which will be on line C of the display. Poke the knob again, beep, the arrow on the left will drop down to line D, turn the knob to BLUE. Poke the knob again, beep, and the arrow will return to line C. The display back ground will have changed to blue. That's it, you can wait the 15 seconds or poke Exit.
Now to change the text color to white, follow the same procedure but this time, the menu item is MAINFC. 33 Poke the upper right knob, rotate the dial to select MAINFC 33 in line C, poke again for the arrow to drop down to line D and rotate the knob to select WHITE. Poke the knob again to lock it in, wait 15 seconds or poke Exit, and you are done. This is the general procedure to change any of the radios Menu numbers and functions or properties. All the Menu definitions start on page 65 of your manual.
I have a hard time seeing red letters against a black back ground. I changed the bottom bar to white letters on a black background - menu items 39 SIG-FC and SIG-BC 40 - which is also the same colors as the top bar, STA-FC 37 and STA-BC 38.
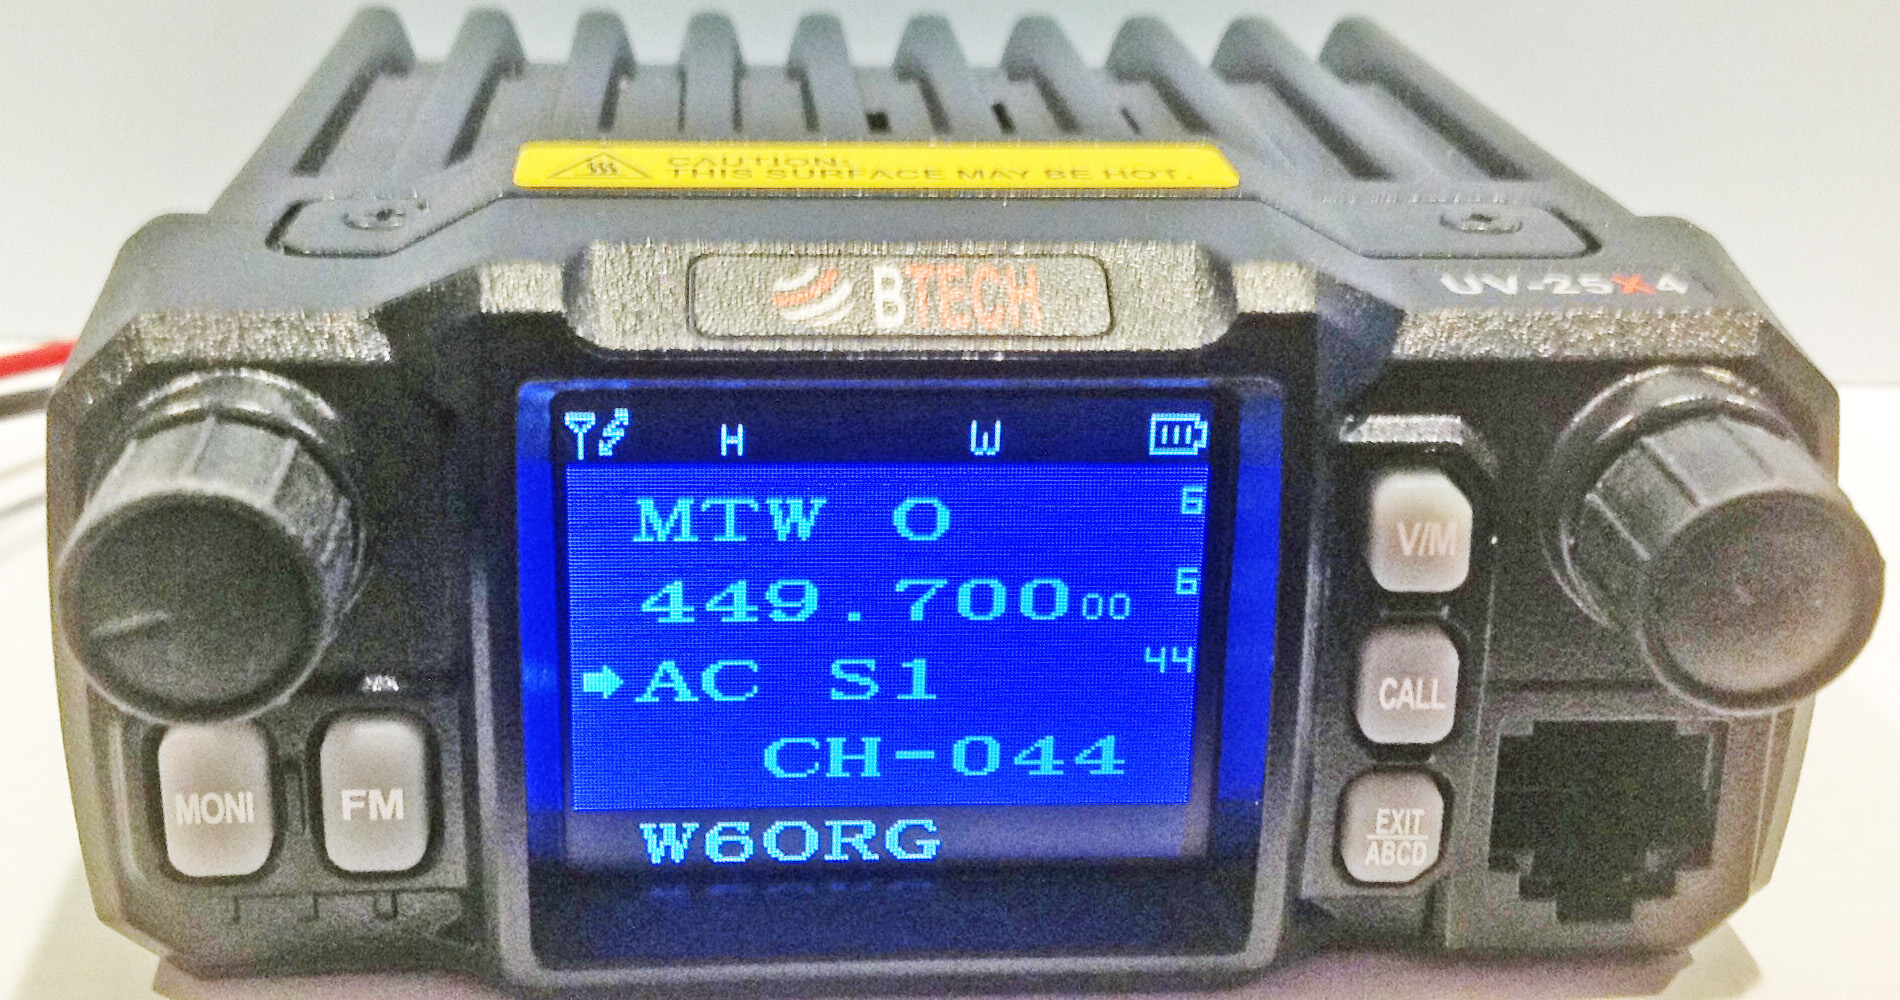 Display Channel Number - If you have a hard time seeing the small channel number on the far right of the 4 line ABCD display, you can opt to select any of the 4 lines to show the channel number as seen in the photo on line D. Lines A and B show the Mt. Wilson repeater in memory channel 006 and lines C and D shows a simplex channel (AC S1) we use for the AC100 race on memory channel 044. You can choose from Frequency (FREQ) , Name (NAME) or Channel (CH). But since lines A and B, C and D are synced together, you cannot have all 3 options synced. The Menu number to change line D is CD-MDF 30. The Menu number for line A is CA-MDF 27, B is CB-MDF 28 and C is CC-MDF 29. The procedure to change line D to a channel number is: Poke the upper right knob, rotate the knob to CD-MDF 30, poke the knob, rotate to CH, poke again, Exit.
In Macs, double click the CHIRP Icon to open it. You might get a pop up that the developer cannot be verified or is unsigned. Click cancel, then while holding down the control key, click the CHIRP icon once then click open at the top of the pop up. You might have to click the icon while holding the control key down a few times and then open in the pop up to get it to open. It may ask for your user ID and password to add chirp and/or drivers to the permitted apps - go ahead and do that the same way you do when you start up your computer. Once you have gotten the CHIRP screen to open, you won't have to go through the control key procedure again.
In Windows, search for CHIRP which is likely in Program Files or your Download folder, and open it.
Turn on the radio and verify you are not receiving any station or noise. You may have to unscrew the antenna or select another channel if there is anyone on the channel or it is picking up static from the computer. Turn off the radio. Plug in your programming cable to the computer and the radio. Your computer should then recognize the USB com port and get the correct driver from the internet - make sure you are connected to the internet. Only use the BaofengTech PC04 cable. There are many pirate ones on the internet. The UV-25X4 uses the FTDI VCP Drivers - scroll down to the Currently Supported VCP Drivers and select the driver for your computers operating system, ie. 2.12.28 in Windows 7 to 10 and 2.2.4 in MAC OS X 10.9 and above.
If connecting your UV-25X4 radio to CHIRP for the first time, from the RADIO pull down menu, select Download From Radio to initiate it and use to input your memory channel and operating data. In the Radio dialog box select BTECH and UV-25X4. If your computer does not automatically select the right Com port in Windows, you may have to try changing the COM number until it does. In MACs the Port will show the driver name. Downloading or uploading to this radio is very slow, so be patient. Save As and name the file as your base data plug in - ie., your call and UV-25X4.